So, in my previous attempt, I wanted to create a smart thermostat for my home. I got to the point where I was ready to program the ESP32… but then life caught up with me and it went to my pile of unfinished projects. But recently I found out a way to do that much more easily using the wonderful ESPHome project.
Architecture and Home Assistant installation
For starters, I wanted to plug this into a Home Assistant installation, which I placed in a Raspberry Pi. You can either flash Home Assistant OS, or start it using Docker. I really recommend Home Assistant OS, if you can, because that way you can seamlessly install other integrations, such as LetsEncrypt or MQTT. However, I reused a Raspberry Pi that was already running pihole, so I ran it using docker. The Home Assistant website has very good instructions about that, so I’m not going to cover those. Make sure you enable Bluetooth after installing it.
I also decided to use ESPHome. This allows us to describe the code that the device will run using a YAML file. ESPHome takes care of installing WiFi connectivity, an access point in case it cannot connect to the configured WiFi, Home Assistant connectivity, and even encryption. There are even several templates that one can use.
ESPHome can be installed via a Home Assistant integration. However, I do NOT recommend running ESPHome on a Raspberry Pi. It will need to compile the code that it will upload to the microcontroller, so you want a decently fast computer. It also does not have to be on the same machine anyway. You will use ESPHome to flash the microcontroller, then when it gets online, Home Assistant will automatically discover it, and you don’t need ESPHome anymore… until it’s time to flash the next thing.
I decided to use a Sonoff Basic switch instead of a home-grown ESP32. A Sonoff switch has an ESP8266, together with a 220V power supply, a status LED, and a relay switch, inside a packaging, and it is cheaper than the materials themselves. ESPHome supports the Sonoff switch and allows us to reflash it. Note that there is even a thermostat support inside ESPHome, but I decided against using it for technical reasons: The place where my thermostat has to go has suboptimal thermal insulation, so I had to use a BLE thermometer instead. The Sonoff switch does not support Bluetooth, so I had to implement the thermostat logic inside Home Assistant.
However, the Sonoff switch is configured to power its output either on or off. It gets a Line and Neutral cabling, and lets Neutral always through, whereas Line goes through its relay switch. My gas boiler has two wires that either need to be connected or disconnected. As a result, I got an additional relay switch and connected that to the Sonoff’s output.
To recap, my Home Assistant host talks to my thermometer using Bluetooth, and to my ESPHome-powered Sonoff switch using WiFi. The Sonoff’s output is connected to a 230V relay switch, whose output goes to my gas boiler. The ESPHome host runs on my computer.
Components list
Hardware:
- A Raspberry Pi 4 or 5, to run Home Assistant
- A Micro SD card for the Raspberry Pi
- A Sonoff Basic switch
- A mains-powered relay switch
- A 3.3V USB to TTL Serial UART Adapter (like CP2102 or Pl2303)
- Some jumper cables
- A single row of header pins
- A soldering iron
- A BLE thermometer with a Home Assistant integration (such as RuuviTag)
- A computer with a USB port that can run ESPHome
- A Wi-Fi access point that can have all devices in its range
- Two short mains cables
- Screwdrivers, cable cutters, pliers
- Ideally, a multimeter to check your connections
Software:
- Home Assistant
- ESPHome
- Chrome
Installing ESPHome
The docker command to run ESPHome is:
docker run --network=host -v /run/dbus:/run/dbus:ro --privileged --restart=unless-stopped -e TZ=Europe/Athens -d -v $HOME/esphome_config:/config --device=/dev/ttyUSB0 --name=esphome ghcr.io/esphome/esphome
Note that you need to create one directory called esphome_config in your home directory, in order to store your config files.
After installing ESPHome, you navigate to http://localhost:6052 to see its front-end. You have to use Chrome for that (as of early March 2024), because Firefox does not yet implement the Web Serial API, which you will need, in order to flash the device for the first time.
Flashing the microcontroller
In order to connect the Sonoff switch via USB, you need to solder a pin header on the board:

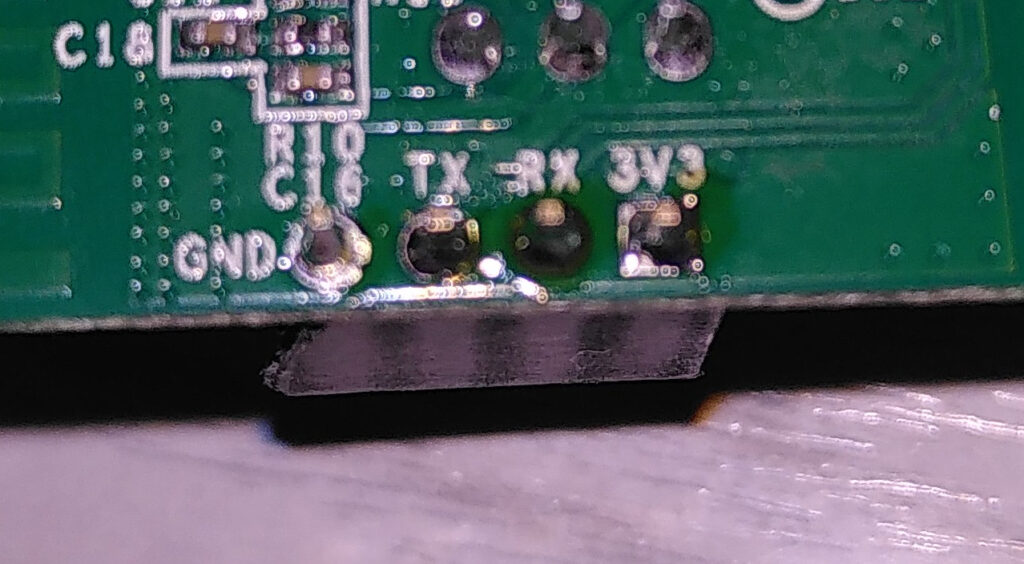
In order to connect it to the computer, you will also need a 3.3V USB to TTL Serial UART Adapter and some jumper cables. Make sure you cross Tx and Rx between the Sonoff switch and the adapter, hold down the Sonoff’s button, connect it to the computer’s USB, keep holding down the button, and release it after 5 seconds.
With the Sonoff plugged into the computer and ESPHome loaded into Chromium, click on the green “New Device” button on the bottom right of the page, and select the appropriate port (should be ttyUSB0 on most Linux distributions). I named mine ThermostatSwitch. ESPHome will then autodetect the device and install the first version of the firmware into it. For this first version, you must select “Plug into this computer”. All subsequent updates can be done over-the-air!
Reboot the board by unplugging it from USB and replugging it. Now, copy the appropriate sections from the YAML template on ESPHome’s website and paste them into the file that you get when clicking “EDIT” in the “ThermostatSwitch” section that should have appeared on the ESPHome webpage. Install it again, over WiFi this time.
Integrating the devices
The Sonoff is now ready to be deployed. Connect its input to the mains power, its output to the relay switch, and the relay switch’s output to your heater. After connecting the device and verifying that ESPHome shows it as Online, you can close the Chrome tab with ESPHome and navigate to your HomeAssistant installation using the browser of your choice. If all went well, HomeAssistant will show a notification on the bottom left that a new device has been detected. Alternatively, you can manually add the ESPHome integration into HomeAssistant and detect your device from there.
The next thing you need is a thermometer. I used RuuviTag, which is also open source. However, I do not recommend its phone app – despite being open source, it contains several trackers. The installation is trivial: Pull out the little plastic that protects the battery, wait a bit, click on the HomeAssistant notification on the bottom left. You can also select which Area (e.g. Living Room, Bedroom) it is in.
Implementing the thermostat logic
Now we have our hardware ready, and it’s time to implement the thermostat logic inside Home Assistant. From the Settings → Integrations page, click Add Integration, and select Generic Thermostat. It should navigate you to the instructions page.
Now, you need to open your configuration.yaml file of Home Assistant. If you are running it via Docker, it should be in the config directory that it asked you to create. Copy the YAML from the Generic Thermostat instructions page and paste it into the end of configuration.yaml. You will need to adapt the heater to point to your Sonoff switch’s entity ID (switch.thermostatswitch_sonoff_basic_relay in my case) and the target_sensor to point to your thermometer (sensor.ruuvitag_XXXX_temperature in my case). You can find the relevant entity IDs from Settings → Devices and Services → Entities.
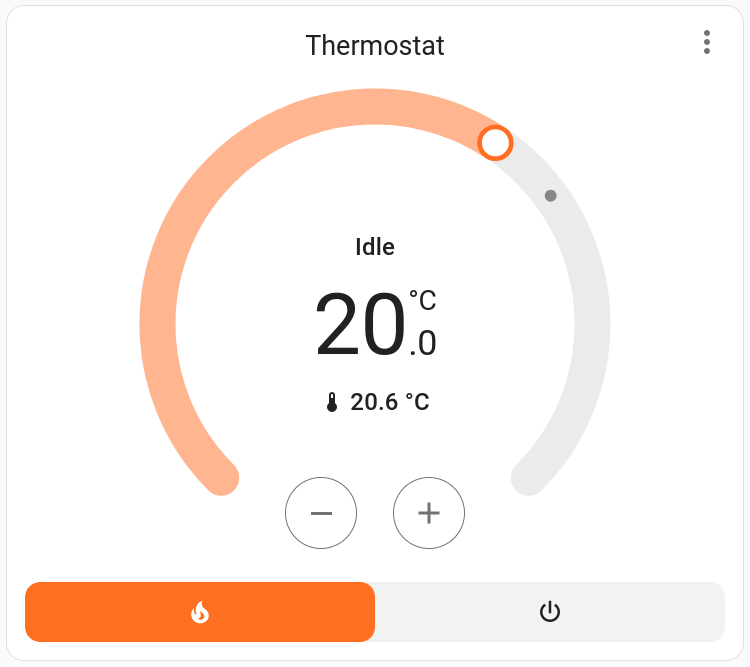
After this, you need to restart Home Assistant. For docker, you just SSH into the Home Assistant host, run docker stop homeassistant, wait for it to complete, then docker start homeassistant. When it starts back up, your default home view will have a nice thermostat included.
Time to add some automations. We want a temperature setting for daytime, and another one for nighttime. Those can be added from Settings → Devices and Services → Helpers. Add a “Day temperature” and a “Night temperature” helper, of type Number, measured in °C.
In my case, I want day to last at 07:00 and end at 22:00. Keep this in mind.
Another thing that I want to implement is the “One hour party” mode that I have seen in another thermostat. Let’s start from this, because we will need to check for it later. From Settings → Automations and Scenes, go to Scripts. Add a script. Then add the following actions:
- From Notifications, Send a persistent notification, that the party is starting.
- From Climate, Set target temperature. I set this to a value slightly higher than Day temperature.
- Type “Delay” in the action search box, and enter a delay of one hour.
- Type “if” in the action search box, and select If-Then. If the time is after 22:00 and between 07:00: Then: From Climate, Set target temperature. This one will require the value of Night temperature. Edit this one in YAML:
service: climate.set_temperature
metadata: {}
data:
  temperature: "{{ states('input_number.night_temperature') }}"
target:
entity_id: climate.thermostat- Do the “else” accordingly, for the Day temperature.
- Send a notification that the party has ended.
Double check your entity IDs and save.
Next, we should make the “Day temperature” and “Night temperature” values take immediate effect when changing them. From Settings → Automations and Scenes, select Create automation from the bottom right. Add a trigger for Entity → State, and select Day temperature. Add a condition for Time and Location → Time, with the time being between 07:00 and 22:00 (you can also make more complex schedules depending on day of week). Add another condition for Entity → State, select the Thermostat entity and the Preset state, and check that it is None. The Away preset is for when you are leaving and want to maintain the home at a relatively low temperature until you are back. Another condition to add is Entity → State. Select the party entity that you created earlier, and select its state should be Off. Then you add an action for Climate → Set target temperature. This one will require the value of Day temperature. Edit this one in YAML like before.
Double check your entity IDs and save. Create another similar automation for Night temperature.
Now let’s create our schedule. This should be simple, based on the things we did before. Add an automation for a start time equal to 07:00. Add a condition for the Preset of Thermostat being None, and for the Party state being Off. On the condition, add the same YAML as earlier. Add a second automation for the night temperature.
If you want, you can also create more helpers for the switching times. I decided to just leave them hardcoded.
Now, you’ll need a way to run your party script. For that, you go to the Overview page of Home Assistant. Edit it from the top right, and choose Take control. Add a Button. The Entity is your party script. The Tap action should be Toggle. If you want, you can take this opportunity to further customise your home screen. Click Done when you’re ready.
Done!
Don’t forget to set up a back up system, or at least to take an image of the SD card. If you suffer a hardware failure, and the SD card is the most common culprit, you won’t have heating until you have everything restored!
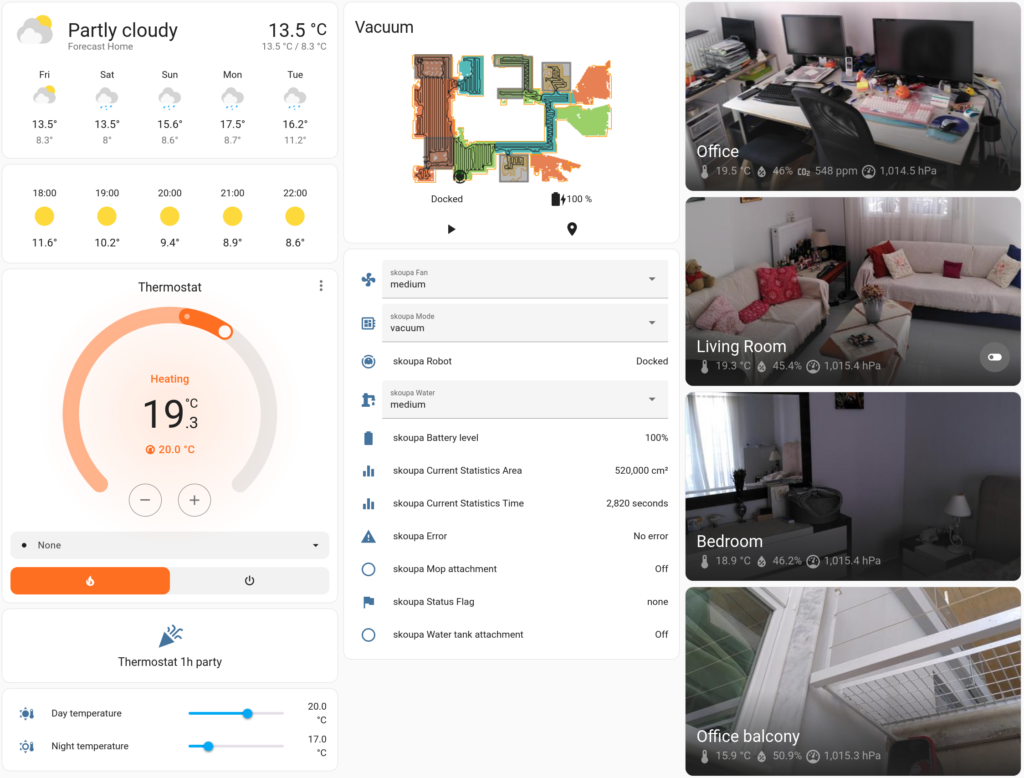
I took the opportunity to do some more things with Home Assistant. I got another Sonoff switch and configured it to turn a light on at sunset and off in the evening. I installed a few more thermometers, as well as a carbon dioxide monitor. I got a robot vacuum and installed Valetudo on it, to prevent it from connecting to the cloud. Here is the final result.